Vuepress: Automatic Sidebar

I didn’t like having to manually specify my sidebar items when creating a vuepress site. To me, it ruined the purpose of a light-weight no-code wiki-site.

To solve this I created a small node.js script to read my docs folder and map out the sidebar items. The first iteration was to simply call a function:

/* config.js */
const sidebar = require('vuepress-auto-sidebar')

module.exports = {
    themeConfig: {
        "base": "/base/path/",
        "sidebar": sidebar.getSidebar(),
    }
}

This worked well but what if you wanted additional configuration? Doing it this way there’s only ever going to be a one-size-fits-all or doing an absurd amount of pre-configuring or even passing parameters to the function itself.

The better solution was to actually generate the code and mutate config.js so it can be changed after the fact. This was done by making it a node CLI script instead.

It basically works the same. Except it also locates the config.js, requires it in the script, modifies the ”sidebar” property, stringifies the object and then rewrites the config.js.

Running vuepress-auto-sidebar in the same folder as .vuepress, would result in something like this:

/* config.js */

module.exports = {
    themeConfig: {
    "base": "/base/path/",
    "sidebar": [
        {
            "title": "Home",
            "path": "/base/path/",
            "collapsable": true,
            "children": []
        },
        {
            "title": "ProjectA",
            "path": "/base/path/ProjectA/",
            "collapsable": true,
            "children": []
        },
        {
            "title": "ProjectB",
            "path": "/base/path/ProjectB/",
            "collapsable": true,
            "children": []
        }
    ]
}
}

We can now fully customize the sidebar to our liking!

If you find this useful, you can check it out on github or npm.

UE4: Dumb data containers

Say you need a dumb data container for usage in either Blueprints or C++.

Does your container need functions? Use a UCLASS UOBJECT, otherwise, use USTRUCT.

UCLASS:

  1. From the editor, create a new C++ class, Show All, choose UObject
  2. Set the following specificers for UCLASS and UPROPERTY in the header file:
UCLASS(BlueprintType)
class x_API UMyObject: public UObject
{
	GENERATED_BODY()
	
public:
	UPROPERTY(EditAnywhere, BlueprintReadWrite)
	MyProperty* Property;	

	UFUNCTION(BlueprintCallable)
	void MyFunction();

USTRUCT:

  1. Create an Empty C++ class from the editor
  2. Edit the header file:
USTRUCT(BlueprintType)
struct FMyStruct
{
	GENERATED_STRUCT_BODY()
	
	UPROPERTY(EditAnywhere, BlueprintReadWrite)
	MyProperty* Property;	

”The libs.CopyLibs.classpath property is not set up.”

Importing a Java Enterprise Application (.ear) project in Netbeans 8.2 from Existing Sources, ant will sometimes erroneously end up not finding CopyLibs in the classpath.

To solve it, you simply double-click (open as separate projects) each and every module in the Java Enterprise Application.

Using MySQL Connector/J (JDBC Driver) with Glassfish

Prerequisites:

1. Download JDBC driver

At the moment of writing, the latest version (8.0.15) of the JDBC driver does not work with Glassfish. Use 5.1.47 instead.

For the lazy, go to your glassfish domain folder

\glassfish\domains\domain1\lib\

and run the following:

wget https://dev.mysql.com/get/Downloads/Connector-J/mysql-connector-java-5.1.47.zip

jar xf mysql-connector-java-5.1.47.zip

move mysql-connector-java-5.1.47\mysql-connector-java-5.1.47.jar .


2. Set up JDBC Connection Pool

Glassfish Admin Console:

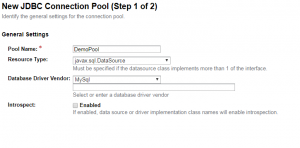
Resources > JDBC > JDBC Connection Pools  > New

Configure as follows:

Pool Settings and Transaction is up to you

In Properties, the following are required:

User: {your db user}

Password: {your db user password}

URL: jdbc:mysql://{host}:{port}/{database name}

Url: jdbc:mysql://{host}:{port}/{database name}

Click ”Finish”

If everything is set up correctly, you should see this:


3. Set up the JDBC Resource

Glassfish Admin Console:

 Resources > JDBC > JDBC Resources > New

Configure as follows:

Remember your JNDI Name

Click ”Save”

4. Use the JDBC Resource

Sample code to connect and start querying:

InitialContext ctx = new InitialContext();
DataSource ds = (DataSource) ctx.lookup("jdbc/DemoJNDI");
        
    conn = (Connection) ds.getConnection();
    
    try {
        Statement stmt = conn.createStatement();
        ResultSet rs = stmt.executeQuery("SELECT 1");

        rs = stmt.getResultSet();
        while (rs.next()) {
        // Do something with ResultSet    
        }
    } finally {
        conn.close(); 
    }

Done!

JavaFX-Project in Netbeans: Compile on Save

In some projects, JavaFX being one of them, NetBeans will force you to do manual ”Clean and Build” to compile instead of simply having it compile on save. Changing this property from the GUI (Project > Properties) doesn’t always seem to be possible. The solution is simple – in your project.properties, change this

compile.on.save.unsupported.javafx=true

to

compile.on.save.unsupported.javafx=false

project.properties is located in /[Projectfolder]/nbproject

Detecting uses of @Deprecated (Java version compatability)

The most straightforward way to find invocations of @Deprecated classes/methods in a given .jar file is the standalone CLI-tool jdeprscan that comes with Java 9.

While it is technically possible to use @Deprecated classes, it is highly discouraged. Especially if the the classes are tagged with ”for-removal”, which jdeprscan can detect aswell.

At best, a @Deprecated class/method may be due to a small spelling error. At its worst, using a deprecated class/method may result in unpredictable and hard-to-detect errors.


To scan a .jar file for uses of @Deprecated, simply do:

jdeprscan myjar.jar


This will check the .jar against the latest installed release in your path. For specific releases, you can use the option –release.

To check for-removal, simply do:

jdeprscan myjar.jar --for-removal


Full documentation here

C++ ”Unable to resolve identifier” error in NetBeans 8.1 (Gnu Compiler Collection)

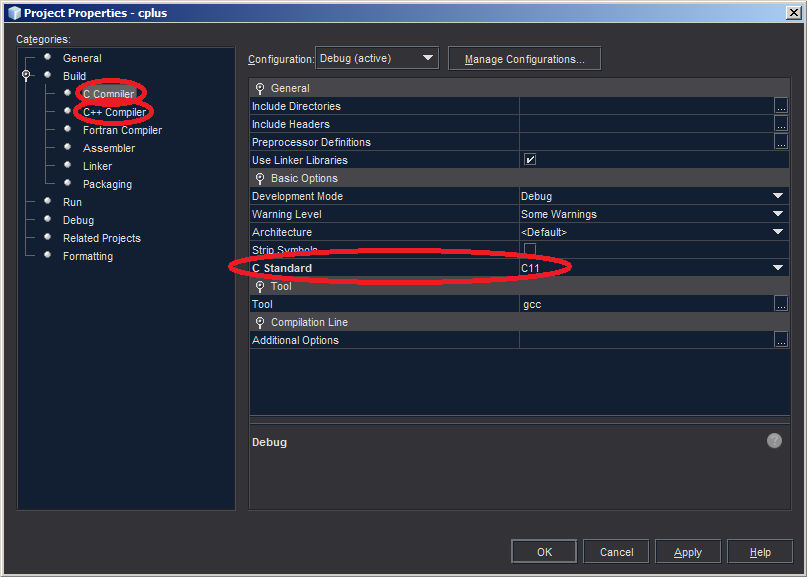
There’s an infuriating bug (?) in NetBeans with C code completion (at least if you’re using the GNU Compiler Collection), where you can end up with erroneous unable to reslove identifier-hints even though the project will compile and run perfectly fine.
To prevent it, set both your C and C++ compiler to the same standard, on every C/C++ project.


(Project > Properties)